


Pre‑Installation Planning & Site Preparation for Solar Pump Controller
Before you touch any wires or panels, proper planning is the most important step to make your solar pump controller work reliably for irrigation. Based on my years of field experience installing solar irrigation systems across farms in Southeast Asia, India, and Africa, I’ve seen too many systems fail simply because of poor site planning. A solar pump controller is the brain of your solar irrigation system, so you must match it correctly to your solar array, pump type, and irrigation needs. Goldbell has been specializing in industrial inverters and solar pump controllers for more than 19 years, and their technical team always emphasizes that correct pre‑installation checks can reduce 80% of later problems.
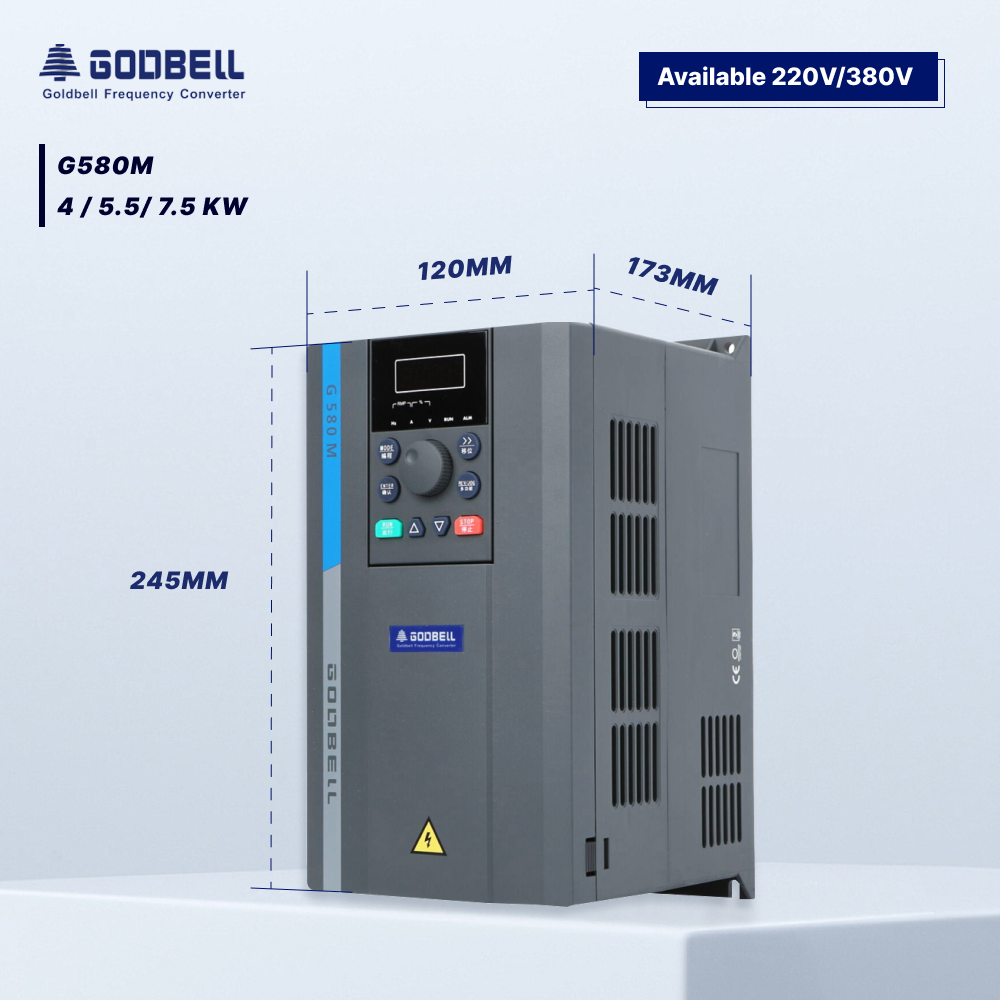
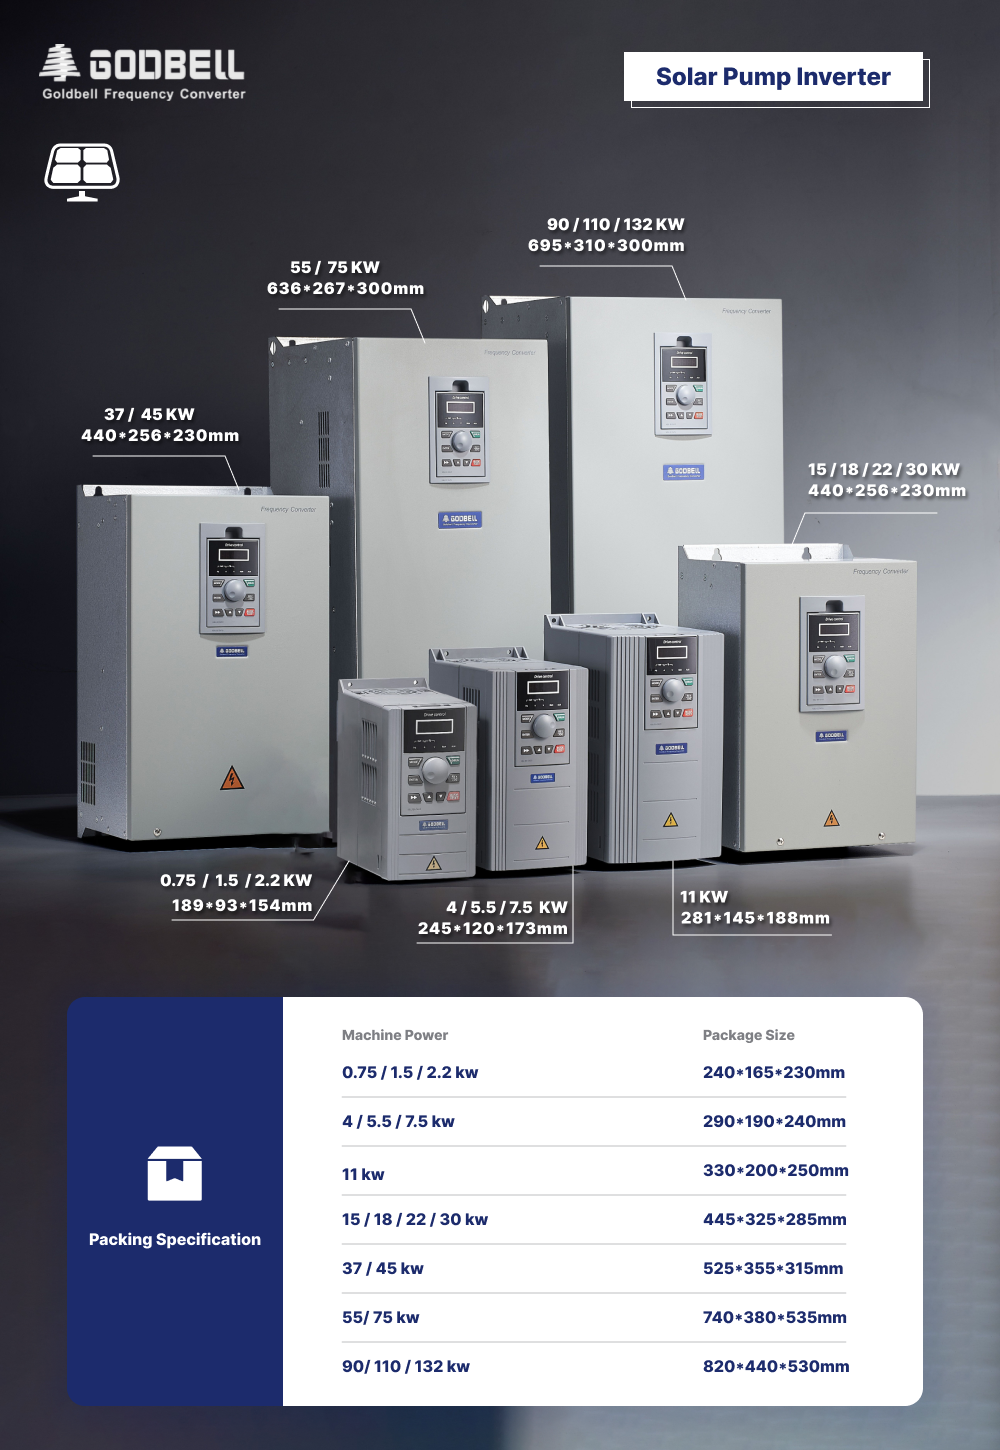
First, you need to calculate your water demand and total head to choose the right pump and matching solar pump controller. I once worked on a mango orchard in India where the client initially bought an undersized controller; it kept overheating and shutting down during peak irrigation hours. After we replaced it with a properly sized Goldbell G580MPV solar pump controller, the system ran stably for over three years without major issues. You should measure the vertical lift, pipe friction loss, and required flow rate. Goldbell’s engineers provide free technical advice to help you select the right model, which is a huge benefit for farmers and installers who don’t have deep electrical backgrounds.
Next, prepare the installation site. The solar pump controller should be placed in a well‑ventilated, shaded area to avoid direct sunlight and rain. Goldbell’s solar pump controllers feature a wide voltage range and multiple protections, but they still need reasonable protection to extend service life. You should also check that your solar panel array voltage matches the controller’s input range. Goldbell designs their solar pump controllers with high‑efficiency MPPT technology, which maximizes water output while achieving nearly zero electricity cost. Taking time to do these preparations will make your installation smooth and your system efficient for years.
Step‑by‑Step Wiring & Hardware Installation of Solar Pump Controller
Now let’s go through the actual wiring and hardware installation of a solar pump controller. This part requires attention to detail, but if you follow the steps, you can do it safely and correctly. From my hands‑on experience, most installation mistakes happen in wiring—reverse polarity, loose connections, or mismatched voltage can damage the controller or void the warranty. Goldbell’s solar pump controllers come with clear labeling and support from online engineers, so even less experienced users can complete the installation with confidence.
Start by turning off all power sources and laying out your components: solar panels, solar pump controller, pump motor, cables, and connectors. Always use copper cables of adequate thickness to reduce power loss. First, connect the solar panel array to the PV input terminals of the solar pump controller. Be careful with positive and negative poles; reverse connection can harm the unit. Goldbell’s controllers include multiple protections such as over‑voltage, under‑voltage, overload, and short‑circuit protection, but avoiding mistakes in the first place is always better.
Then connect the pump motor to the output side of the solar pump controller. For three‑phase pumps, make sure the phase sequence is correct; wrong wiring can make the pump run backward and reduce water flow. Once all wiring is done, double‑check every connection for tightness. Goldbell’s G580MPV series uses high‑quality terminals and durable internal components to ensure stable performance even in harsh farm environments. After wiring is complete, you can close the controller box and prepare for parameter setting. Proper wiring not only keeps your system safe but also helps the MPPT function work at its best to harvest maximum solar energy.
Parameter Setting & Commissioning for Solar Pump Controller
Setting parameters correctly is what turns a connected solar pump controller into a smart irrigation system. Many users just plug in and run, but fine‑tuning the parameters can greatly improve efficiency, save energy, and protect your pump. Based on field experience, correct parameter settings can increase water output by 15%–25% compared to default settings. Goldbell’s solar pump controllers are designed with user‑friendly panels and intuitive operation, making setup easy even for non‑experts.
First, set the basic operating parameters: start voltage, stop voltage, running frequency, and protection thresholds. The high‑efficiency MPPT function in Goldbell’s solar pump controller automatically tracks the maximum power point of the solar panels, so you don’t need to adjust that manually. You should set the start voltage slightly above the lowest usable voltage of your panels to avoid frequent starting and stopping. Soft start is another key feature of Goldbell controllers; it reduces inrush current and protects both the controller and the pump motor, extending their service life.
Next, test run the system. Turn on the power and let the solar pump controller start the pump automatically when sunlight is sufficient. Watch the display for voltage, current, frequency, and fault codes. I always recommend running the system continuously for 1–2 hours to check for abnormal noise, overheating, or insufficient water flow. During my project in Zambia, a farmer’s new G580MPV 15kW solar pump controller showed a fault code after installation. We checked the parameters and found a wrong voltage setting; after correction, the system worked perfectly. Goldbell’s technical team provides online support to help you solve such problems quickly.
Practical Experience: Troubleshooting Common Solar Pump Controller Issues
Even with perfect installation, you may face small issues during long‑term use. Based on hundreds of on‑site cases, I’ll share the most common problems and how to fix them with your solar pump controller. These tips will save you time and avoid unnecessary service calls. Goldbell’s stable design and comprehensive protections reduce failures, but knowing basic troubleshooting makes you more independent.
One common issue is that the pump doesn’t start in the morning. Usually, this is because the solar voltage is too low or the start parameter is set too high. Simply adjust the start voltage slightly lower, and the system will start normally when there is enough sunlight. Another problem is low water output. This can be due to incorrect frequency settings, blocked pipes, or poor solar input. Goldbell’s solar pump controller shows real‑time operating data, so you can quickly tell whether the issue is from the solar side, the controller, or the pump.
Overload or over‑heating faults often come from mismatched pump power or poor ventilation. Make sure your solar pump controller is rated for your pump’s power. Goldbell offers a wide range of models from small to high power, with large stocks ready to ship. I’ve seen farms save a lot of money by choosing the right Goldbell controller instead of over‑paying for oversized units. Remember, regular cleaning of solar panels and checking cable connections will keep your system running smoothly for years.
Long‑Term Operation & Maintenance of Solar Pump Controller
To get the most value from your solar irrigation system, you need proper long‑term operation and maintenance for your solar pump controller. A well‑maintained controller can last 10 years or more, providing reliable water for your crops. Goldbell focuses on stable quality and long‑term partnerships, so their products are built for durability and low maintenance.
First, do monthly inspections: check the indicator lights, test button functions, and make sure the cooling vents are not blocked by dust or dirt. In rural areas with a lot of dust, cleaning the controller every 2–3 months helps prevent overheating. Goldbell’s industrial‑grade design ensures stable performance even in harsh environments, but basic care still helps.
You should also check the solar panels and cables every few months. Dirty panels reduce power, and loose cables cause voltage drops. Since your solar pump controller relies on stable input power, keeping the panels clean improves overall efficiency. Goldbell’s global service network supports customers in more than 60 countries, so you can get professional support whenever needed.
Finally, keep a record of operating hours and any faults. This helps you predict maintenance needs and avoid unexpected downtime. Using a Goldbell solar pump controller means you have a reliable partner with nearly 20 years of experience, professional R&D, and fast technical support. With correct setup and simple maintenance, your solar irrigation system will provide consistent, cost‑free water for your farm year after year.
Table of Contents
- Pre‑Installation Planning & Site Preparation for Solar Pump Controller
- Step‑by‑Step Wiring & Hardware Installation of Solar Pump Controller
- Parameter Setting & Commissioning for Solar Pump Controller
- Practical Experience: Troubleshooting Common Solar Pump Controller Issues
- Long‑Term Operation & Maintenance of Solar Pump Controller